Taking quick snaps while reporting a story is a great trick for fact-checking or to recall visual details while writing. But what if you want to take good photographs that could actually run with your piece and add a visual storytelling element?
The days are long gone when editors had budgets to assign a photojournalist to every feature. For writers, stepping into the role of photographer may feel intimidating. But to get started adding visual elements to your own stories, all you need is a few hundred dollars to invest in a camera, and the desire to figure out how to use it.
That’s what I learned from New Orleans–based photojournalist Ted Jackson when I took his Fundamentals of Photography class in the fall of 2019. A longtime staff photographer at The Times-Picayune, Jackson won a 1997 Pulitzer for the series “Oceans of Trouble,” about the collapse of global fisheries, and in 2005 shared two Pulitzers for the newspaper’s Hurricane Katrina coverage. Now, as a freelancer, he continues to cover environmental issues, such as the sinking of a Louisiana island due to climate change.
I sat down with Jackson over falafel to glean his advice for science reporters who want to get started in photojournalism. Good photographs are more than accessories, Jackson says. They help convince people to read your story. Science writers already know the role of a good title, lede, or nut graf. But a striking image might do an even better job of pulling readers into your story. A photo is, after all, worth a thousand words. It provides instant character, context, and clues to what your story will illuminate in text.
“The camera is immediate,” Jackson says. “It is trustworthy.”
While it is possible to take great shots with an iPhone, most publishable photos are produced with a digital single-lens reflex (DSLR) camera. These cameras have removable lenses that enable you to pick the best option for close-up or landscape shots. They also have large sensors that capture more light, adding detail to images and making it possible to get good results under poor lighting conditions.
Jackson recommends that, whatever type of camera you own, you take it with you everywhere. You never know when a great opportunity for a shot will come up and you don’t want to be unprepared. Juggling reporting with taking photos can be a lot to manage, but it gets easier over time.
“I just love what you can do with photography. I love that you can communicate,” Jackson says.
Prepare, but Be Flexible
Before you head out to report, research the visual aspects of the story as thoroughly as you would a person’s background when preparing for an interview. Try to find out what the environment you’re going into looks like and what potential it offers for different scenes. Check Google Maps and websites for existing images of the location.
Just as you try to interview a range of sources who bring distinct perspectives to a story, consider the broadest range of potential images. Then walk through the process of setting up those photos in your mind.
“I try to pre-visualize what picture I want and how I would get it,” Jackson says. “Do I need a car? Do I need a boat to get the shot? Do you need a passport person—someone who can get you into a forbidden location?”
Think about what special equipment or access you might need to arrange in advance. Perhaps you want to set up a tour of the lab with extra time for photographs. Or if you want to photograph two people together, you’ll need to schedule your interviews so that they are in the same place at the same time. Want to get a shot from above? Bring a ladder. Will you need to wade into water to photograph an invasive marsh plant? Bring boots and a change of clothes.
Veteran environmental journalist Larry Pynn checks the weather forecast when setting up interviews and tries to pick a day with the best chance of being sunny. He usually brings his DSLR, a Canon Rebel EOS SL1, when reporting a story, but on a sunny day, an iPhone can do the trick.
Jackson suggests arriving early at the assignment to scout light, shadows, traffic, and other conditions. Take test shots to dial in the camera settings that will produce your desired results, given the weather and environmental conditions. If it’s an important shoot, visit the location beforehand to familiarize yourself with it.
But don’t get so stuck on visualizing your ideal shots that you ignore the actual moments happening in real time. “It’s important to be flexible,” Jackson says. “It’s easy to miss pictures because you think you know what you want.”
When Pynn traveled to remote Calvert Island in British Columbia for a Hakai Magazine story about a beached whale, the story’s lead image ended up being something he snapped with his iPhone (see photo below).* It’s a striking image: well-lit, well-framed, and it piques interest in the story he goes on to tell. Sometimes timing and instincts are more important than equipment or planning.

Think Visually
A photo is a rectangular representation of reality and, as wielder of the camera, you get to choose what goes inside those four corners. This is what photographers call composition. A handful of rules can guide you to a more interesting photo, Jackson says.
- Rule of thirds. Avoid putting your subject smack in the middle of the frame. Instead, put them about a third of the way in.
- Leading lines. Set up the photo so your viewer’s eye follows linear objects—a row of trees, a fence, an outstretched arm, and so on—toward a visually interesting reward.
- Framing. Highlight your subject within a framing device, such as a window, a hole in a fence, or between two trees. The more interesting the frame, the better the trick works.
- Light attracts. Light is your medium, Jackson says. People naturally are drawn to brightness, so be aware of how light in your image is directing the viewer’s eye.
In a review of my practice shots, Jackson picked out one of my photos as an example of strong composition (see photo below). The man opening the gate is offset from center (rule of thirds), his arm and the lines of the opened gate direct your eye into the courtyard (leading lines), the soccer scene is framed by the concrete opening (framing), and the lit-up courtyard interior draws your eye into the action (light attracts).

Look for Depth
Both Jackson and Mark Garrison, the art director at Hakai Magazine, say the best photos contain depth. They mean depth in both a literal and a figurative sense.
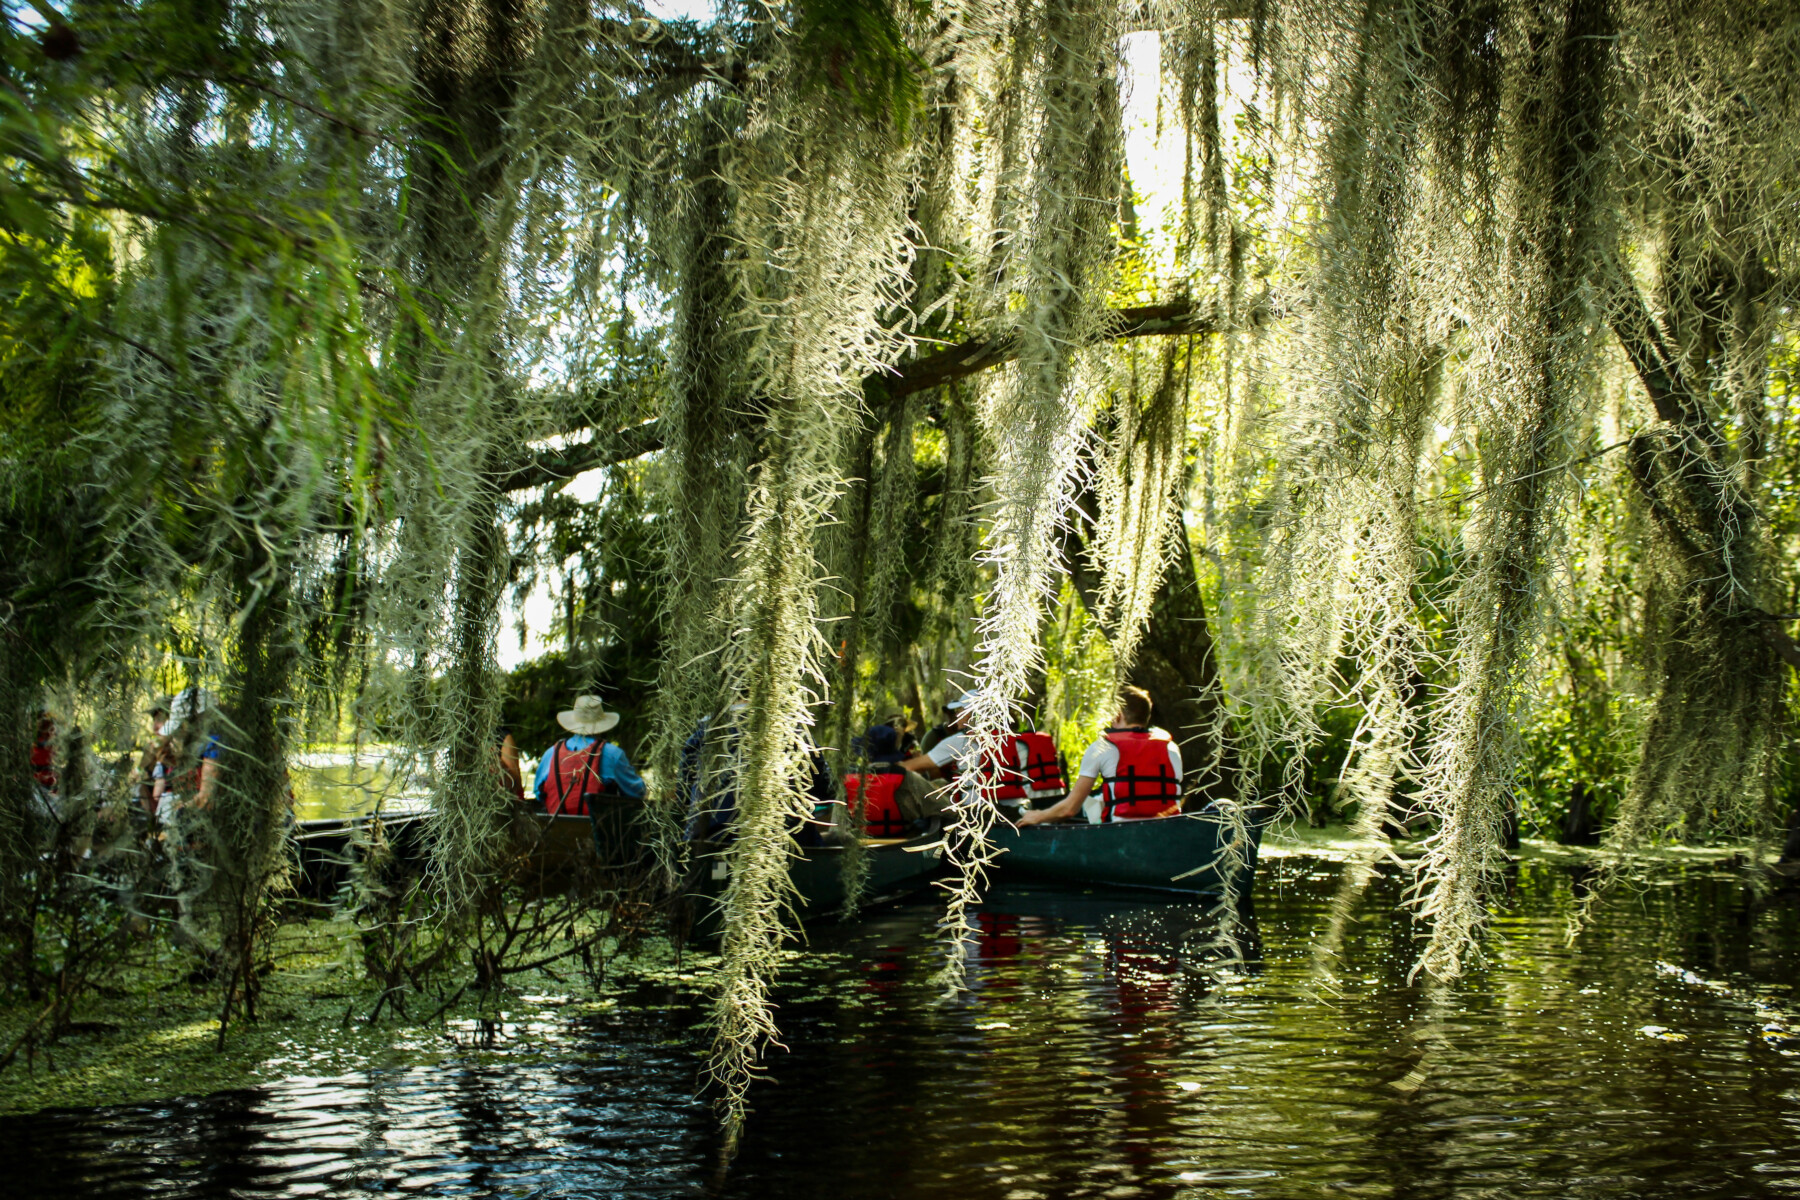
The literal kind of depth is a contrast between foreground and background. An example is a photo I took a couple of years ago from a canoe, when natural backlighting enabled me to frame an image from an unusual perspective through the Spanish moss (see photo below).
The other kind of depth has more to do with content than technique. It happens when multiple visual elements are layered to tell a story that is deeper than the subject matter of an image.
To produce visuals with either kind of depth, you need to look for images that go beyond the obvious. “I really like photos taken from a perspective that is less common, like a shot half in and half out of the water,” Garrison says.
Capturing depth comes from knowing your subject matter well and having done your research on the topic and people ahead of time. Knowing to pull the trigger on an image during the moment when your subject is in the right environmental context will yield a photograph with layers and symbolic meaning. Perhaps this means lining up an action shot of a soil scientist in the foreground holding a fresh sapling with a burned forest in the background—suddenly you have depth in both the literal and the figurative sense.

Experiment with Your Camera
As a science journalist, you’re used to technical subject matter, so don’t be afraid to experiment ahead of an interview with the advanced features on your DSLR. The more comfortable you are with your camera settings, the more easily you’ll be able to juggle reporting and shooting. Most camera settings are designed to let you adjust light to produce the best image. The three main ones to understand are ISO, shutter speed, and aperture.
International Standard of Organization, or ISO, indicates your camera’s sensitivity to light. The most universal setting is ISO 400, which produces great images in most conditions. Lower settings (ISO 100 or 200) will produce the highest quality images in brighter light. Low-light situations, which can result in lower quality images, can sometimes be saved with higher ISO settings (ISO 3200 and higher).
You can think of the camera’s shutter as its eyelid. The longer your shutter is open, the more light enters the camera. Faster shutter speeds (1/250 or higher) capture motion with definition. Slower speeds (1/30 or below) produce special effects like blurred waterfalls.
If the shutter is an eyelid, the aperture is a pupil, which can dilate or constrict to let in more or less light. Aperture determines the depth of field, which means how deep into your image the objects are in focus. A larger aperture (such as f/64) helps create a photo that is focused throughout. A low aperture setting (such as 2.8, 4 or 5.6, depending on the quality of your lens) produces a shallow depth of field in which your subject will be sharp against a soft background.
If you increase your aperture, you may need to decrease your shutter speed and vice versa so as to not let in too much light and overexpose the image.

Don’t Be Too Literal
Those of you with a science background, this one is for you. Yes, if you’re writing a story about research at the border wall, it might be nice to have a landscape shot of the wall with a construction truck in front. But a portrait of a scientist looking troubled while staring in the direction of the wall might be even better. Adding layers helps make a photograph more unique and emotional. “I think it’s easy to get caught in the trap of being too literal,” Jackson says. “Those shots are nice to have. But they usually don’t inspire. It’s the symbolic shots that inspire people.”
When shooting a story about the impacts of an offshore oil spill, Jackson didn’t get hung up on finding birds covered in oil. Instead he photographed healthy pelicans (see photo below). Jackson says this shot may not have been the most obvious choice, but the oil rig in the background added depth and meaning, making the photo timeless.

Yes, It’s Science, but Don’t Forget the People
Not all photos need a person in them, but often those are the ones that will drive your story. They’re also the most awkward to take. Sometimes beginning photographers are shy about asking to take someone’s photo, and you can tell when looking at the photo that the situation was uncomfortable for both the photographer and the subject, Jackson says.
Warn subjects at the beginning of the interview that you’d like to spend a little time taking photographs later. Have your camera visible while you’re conducting your interview so they can warm up to the idea, Jackson says. Take lots of shots, until it feels relaxed and natural. Make sure to get close-ups as well as shots with background, which are called environmental portraits. Try photographing people doing something rather than posing them in front of something related to their work. Pynn says people feel less self-conscious when they are busy (see photo below).
Hakai Magazine’s Garrison says that one common problem he runs into with writer-submitted photos is a lack of attention to lighting on the person. Make sure your subject’s face is not hidden in shadows under a hat or a tree. “There’s only so much we can do to salvage a photo where the subject’s face is totally dark,” Garrison says.

Follow Ethical Guidelines
Unlike photographers, photojournalists don’t stage shots. Asking a subject to stand in front of a particular background is okay, but avoid asking them to re-enact a motion or event. Similarly, while it’s fine to realistically adjust tone and contrast, altering the meaning of an image with Photoshop is as bad as inventing quotes for a story.
Another ethical consideration is how you communicate with your subjects. Photography is intimate and images are revealing, Jackson says, so photojournalists need to be sensitive to their subjects and surroundings. Make sure to ask permission to photograph children or sensitive moments.
Delicacy is especially important when dealing with communities whose trust you are working to gain. Writer and social entrepreneur Ian Gill, who frequently covers Indigenous communities, emphasizes how important it is to be up-front with subjects, especially members of marginalized communities, about how you intend to use your images—whether for publication or just to preserve the scene for your own memory. “It’s important that people know you’re taking photos for publication, just like it’s important they know you’re a journalist writing about them for publication,” says Gill.
Gill always introduces himself as a journalist when out working on a story and asks permission to photograph events (see photo below). Being honest and considerate usually results in better images, because subjects who feel safe and respected are more likely to reciprocate with openness.
These rules of realism—not staging photos, capturing moments as they are, limited editing options—can be challenging, says Jackson, but they are ultimately what lend photojournalism its power.

* Clarification: An earlier version of this story stated that Larry Pynn brought a Canon Rebel EOS SL1 camera to report on a beached whale in British Columbia, but ended up taking his photo with an iPhone. The story has been updated to clarify that Pynn does use this camera but did not bring it with him on that particular reporting excursion.

Joan Meiners is a roaming science journalist who has lived in nine different states. Her writing on the environment has been published in ProPublica, Smithsonian Magazine, Orion Magazine, The Times-Picayune, and elsewhere. She has a PhD in ecology with a focus on bees. Connect with her about science, writing, or bees on Twitter @beecycles.