One hundred fifty miles off the coast of Washington State, while I was video-documenting a three-week science expedition in 2011, the optical block of my primary video camera died. Fortunately, I had backups, but the camera breakdown got me thinking differently. I’d been taking some shots with my iPhone 4 around the ship—both down in the lab and on deck. It was far less obtrusive than my big camera, and I’d noticed that people I was recording minded it less. So with the big gun down, I thought it might be fun to see what I could do with the iPhone in a pinch. I tried to shoot a sit-down interview with a scientist in a difficult mixed-lighting environment—a bit of daylight coming through a porthole, combined with old overhead fluorescent lights.
Turns out my iPhone 4 and I were not up to that task. Using the phone’s built-in camera app, I could not adjust my color balance or exposure accurately—or really fix it in postproduction. I decided to stick to shooting the phone only in bright, even light, and shot the rest of the expedition with my old but utterly reliable tape-based HD video camera.
That was more than four years ago. Times have changed, and so have camera phones and phone apps. The devices have gotten dramatically better, with improved controls. I currently own an iPhone 6, but it’s no longer the only game in town. Some reviewers even rate the camera capability of current phones by Samsung, Sony, and LG above that of the iPhone 6s. If you have a new smart phone, you have the power in your pocket to make a decent movie.
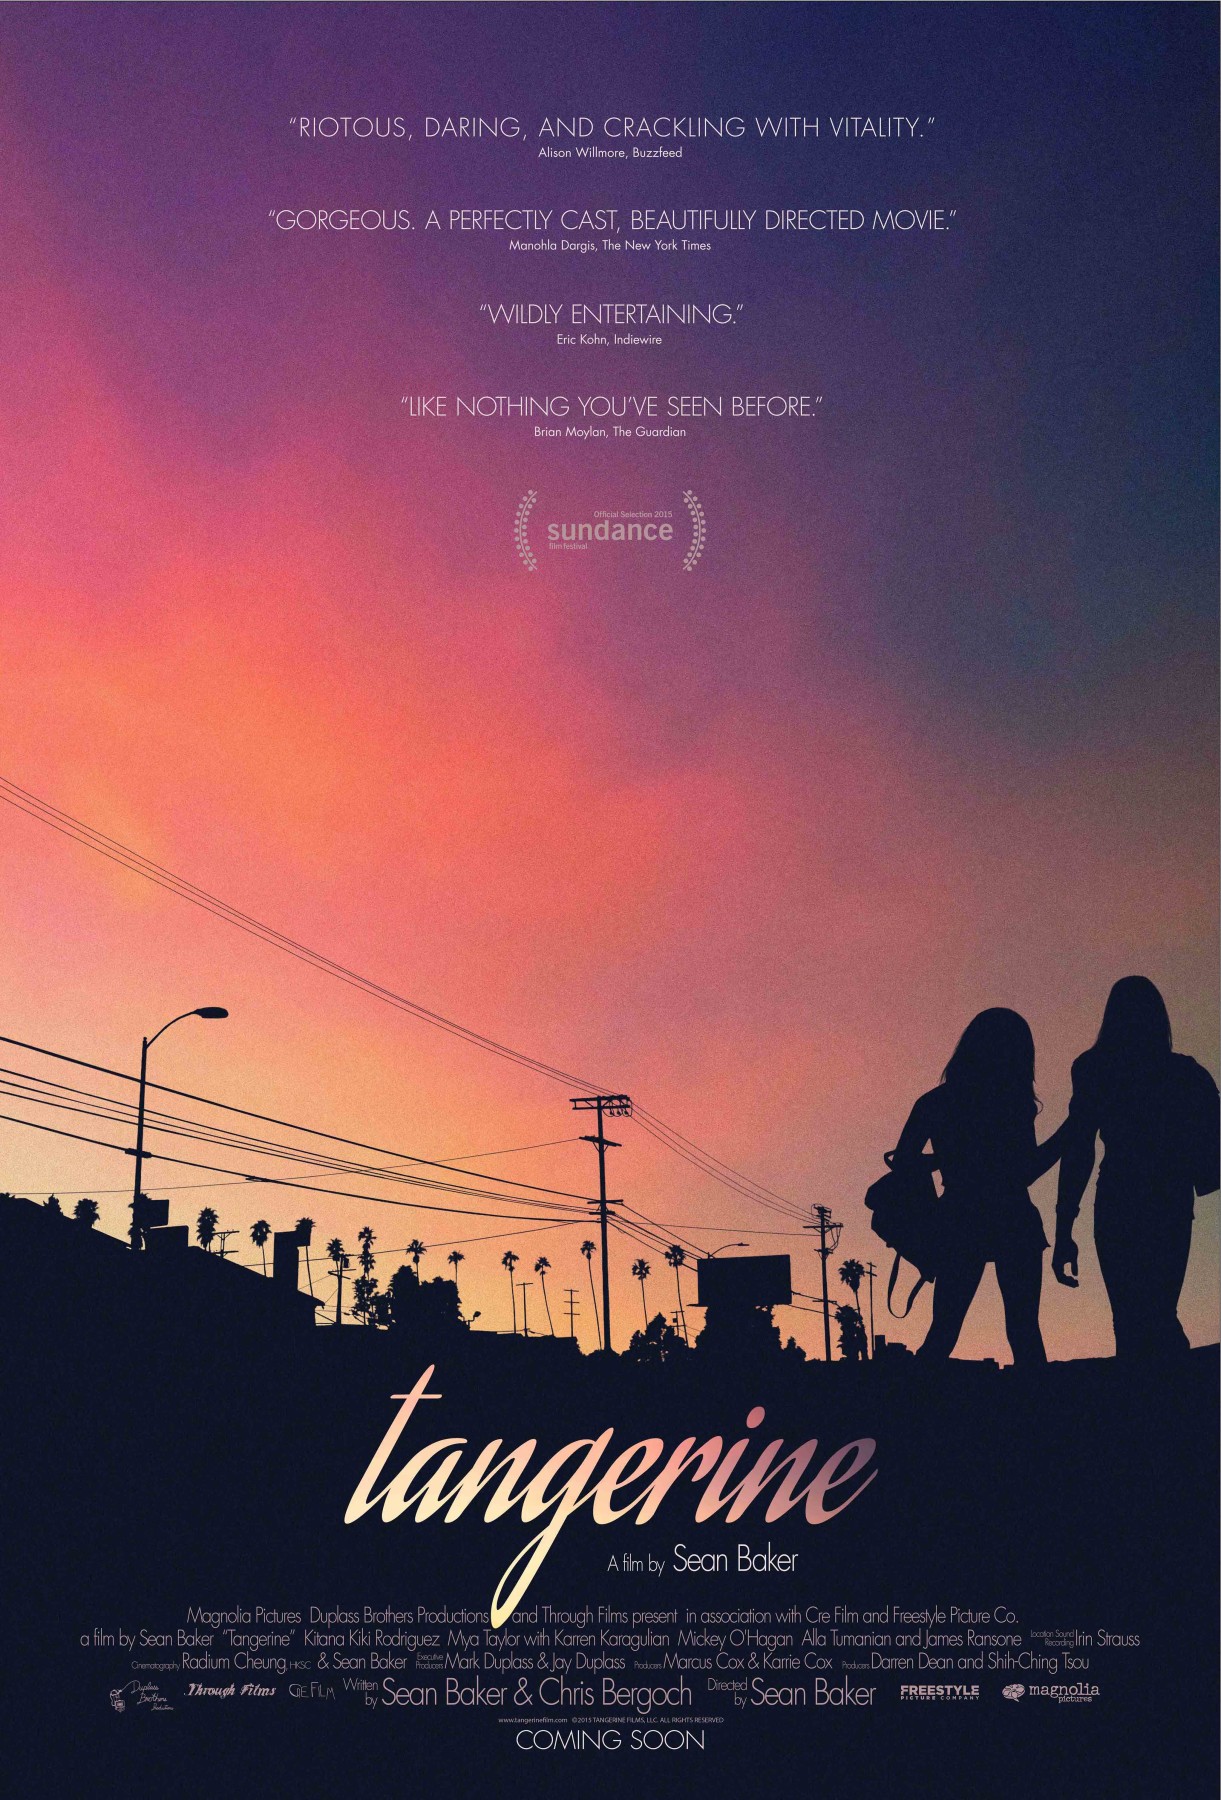
And if you look around, you find people doing just that. The feature film Tangerine, which premiered at the 2015 Sundance Film Festival and is now available for rent, was shot entirely on the iPhone 5 and picked up for distribution for $1 million. Bentley Motors commissioned a short documentary that was produced using only iPhones. And last summer, a Swiss TV-news station switched to iPhone 6 kits for their field reporters. A smart-phone camera is a solid tool.
But just as having word-processing software on a fast computer does not make you a brilliant writer, a good camera doesn’t make you a great video producer. A good camera can, however, put you on the road to becoming a good video producer as you start learning the craft of filmmaking. Your smart phone could be that camera.
Define Your Goals
Before you ever press the record button, it’s important to ask yourself what you’re trying to accomplish or communicate with video, and why you’re doing that instead of taking still photos. Maybe it’s because, for example, video is such an excellent medium for conveying emotion.
There are lots of things you can do with it. You don’t have to make a feature film—not yet, anyway. You can also add short videos as sidebars to written web stories. Videos can be an excellent way to quickly explain scientific processes that are easy to understand if you can see them but would take a long time to explain in writing. Video interviews with scientists can also add texture to written stories.
You could also shoot an introductory clip for an event to post on Facebook, creating a sense of place and excitement. As you get more skilled, you could produce a short documentary to run on YouTube or Vimeo. And if you’re interested in live events, you could produce live streaming video with apps like Periscope and Meerkat (if you have the connectivity and data plan).
When I’m working, I mostly shoot to edit, meaning I tend to take a lot of shots—wide, medium, and close-up shots—from different positions, of different things. I try to make each shot at least 10 seconds long. I edit the pieces into a story on a computer afterwards. What you want to create will inform what you should shoot and what extra tools will make your smart-phone video better.
Stabilize Your Shots
It’s hard to watch bouncy video. It makes me want to click away. (Ironically, very high-end productions sometimes try to recreate that jerky consumer-shot video look. They are trying to make it look edgy by being deliberately amateurish. You shouldn’t do that yet because yours will only look authentically amateurish.)
Internal stabilization in cameras—including the iPhone—is getting very good, but it won’t save shots that jiggle a lot. Practice holding the camera very still. Hold it against something that won’t move, like a table, windowsill, or fence post. If there is nothing else, use your body as a tripod.
Hold the camera in both hands and try resting your elbows on something. Otherwise, keep your arms as close to your body as possible so they don’t get tired reaching out. Hold very still and brace yourself in a way that lets you keep the camera as steady as possible.
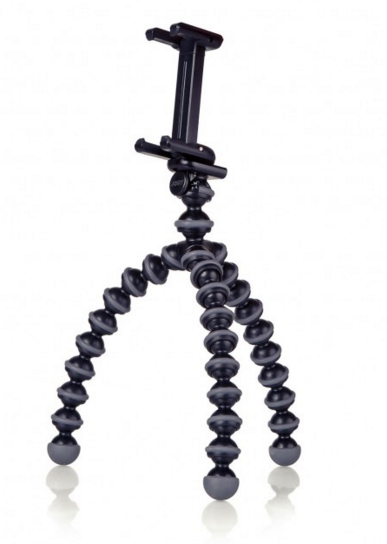
There are many ways to stabilize your camera if you become a more serious student of filmmaking. My favorite way is with a good tripod. Or you could use a good-enough tripod when you’re just starting off, something small like a GorillaPod, which gives you more flexibility on where you can set your camera.
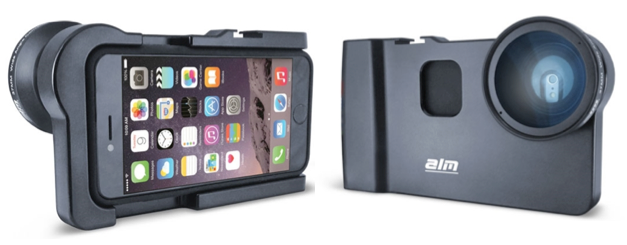
To use a tripod with a phone, you need a way to attach the phone to the tripod. An inexpensive option costs about twenty dollars. I use a pricier metal case called the mCAM, which holds the iPhone, provides tripod-mount holes, and holds different lenses over the top of the iPhone camera’s lens. (Several manufacturers make these over-the-phone lenses that expand the ability of the built-in lens.) You can even get a true Steadicam that is made for the iPhone—they used it to film Tangerine—but you probably don’t need that yet.
Finally, let action happen in the frame instead of you chasing it down. Let your subject leave the frame before you move to reframe, especially if you plan on editing clips together later. This can also make for a good ending if you are just doing one shot.
Look for Good Lighting
Almost any camera will give you better results if the lighting is good, and by good I mean plentiful, from one source, and generally even across the scene. The sun is one of those sources, and it tends to be bluish in color, especially compared to indoor tungsten lighting, which tends to be orangish, or fluorescent lighting, which can look greenish. Mixing light sources can really throw off white balance, so it’s usually best to shoot with one main source.
Outside, bright sun will make crisp, clear video of places and things. But people may squint in bright sun if you make them face it. Try putting them in evenly lit shade, like the shade of a building in the morning or afternoon, to see if you can get better facial expressions and still have sufficient light for a good exposure. The key here is to avoid a mix of shade and sun, like under the branches of a sparse tree. If the difference between the shadows and highlights in a frame is too extreme (high contrast), it’s hard to make a good exposure, so it’s better to reframe the shot. Overcast skies are often still nice and bright, but the light is easier on people and less troublesome for contrast.
Indoor light can be challenging for several reasons. The first reason is that it’s usually not nearly as bright inside. If it’s not bright enough, your camera will turn up the ISO, or sensitivity to light. If that’s not enough, it may try to “fake” making the scene seem brighter by boosting the gain. Both adjustments make the image lose details and look grainy. One way to avoid this, if possible, is to shoot near some big windows that let in sunlight and raise the overall light levels.
Some of the least attractive indoor light is created by the overhead fluorescent lights that illuminate many a laboratory and office building. Fluorescents can have a greenish cast, and if you’re trying to interview a person, the light direction—from above—can cast shadows that obscure the eyes while overexposing the forehead. It’s not a good look. You can overcome this problem if you turn off the overheads and use window light or your own lights. Remember, for interviews you want nice even light from one source. If you can’t do anything about bad lighting, it may be best to find a different location, although it’s not as critical when you’re shooting lab equipment and people-free locations.
Pick a Good Location for an Interview
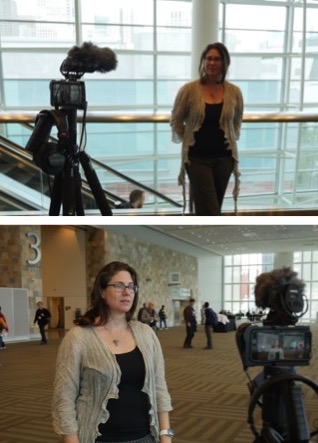
You can overcome a lack of equipment if you pick a good location and orientation to shoot. In the photos at left (of NASA’s Karen Fox), big windows at a conference center let in lots of diffuse natural daylight. But you don’t want to position your interviewee so the camera is shooting into the light. As shown in the top photo, doing so creates extreme contrast: The windows are too bright, and the subject is too dark. It’s much better to have the light falling on your subject, as in the bottom photo. Simply turning around dramatically improves the lighting on the subject.
For this interview, my iPhone is in an mCAM rig on a tripod, with a shotgun mic on top, plugged into the phone via a minijack adapter cable. I plugged headphones into the audio out plug of same cable. This setup is decent for run-and-gun situations when you don’t have time to put a lapel mic on the subject, as is the case for many quick interviews. If I do have time, though, I prefer to use a wireless lapel mic. Then I can follow interviewees around a bit and still get good audio, because the mic stays positioned near their mouth even when they turn away. If you only have the built-in mic, pick the quietest location and get as close to your subject as you can without making them look funny (note that wide angle lenses, close up, distort whatever is closest to the camera).
Select Your Focus and Exposure
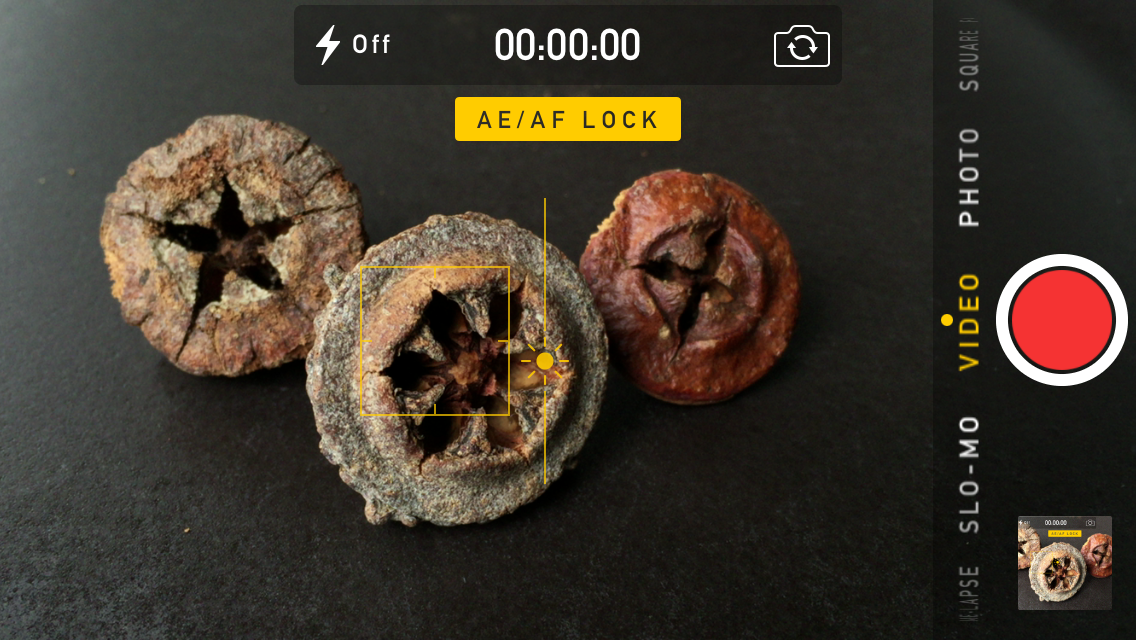
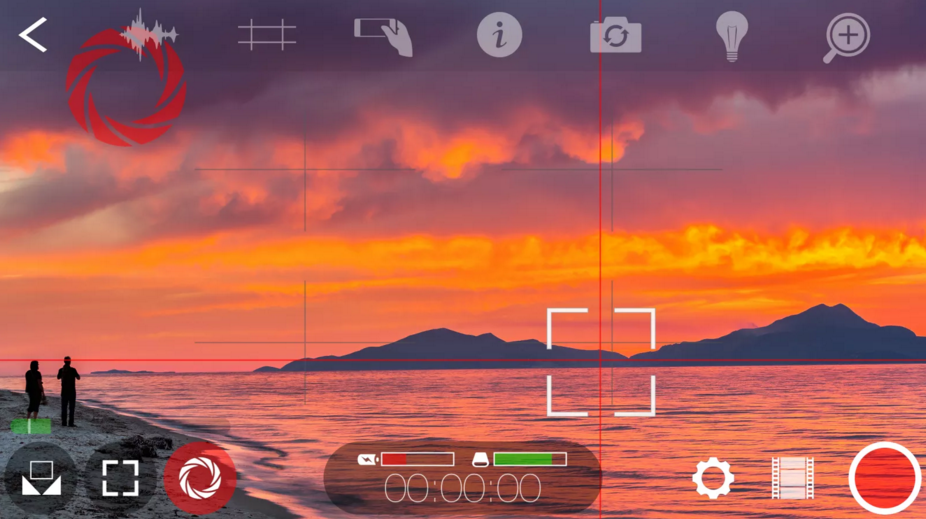
Next, you’ll want to set the exposure and focus of each shot. On the most recent version of the iPhone camera app, if you touch the screen, the camera will focus on and set the exposure (the amount of light that hits the camera’s sensor) for that area of the image. A yellow box appears around the spot you touched. In earlier iPhone versions, you couldn’t separate focus and exposure. In iOS 8, the little sun to the right of the box means you can drag up anywhere on the screen to make the whole scene brighter, or down to make it darker, while maintaining your focus point.
If you touch the screen again in a different spot, it changes focus and exposure to the new spot. If you hold your finger in the spot you want to focus on, a little yellow banner displays the setting AE/AF LOCK. That means you have locked the exposure and focus, which won’t change during a shot until you touch the screen again. You definitely want to lock your focus if, for example, you are interviewing someone. Always focus on the eyes of your interviewee.
If you find yourself getting serious about shooting video with your phone, consider buying the excellent app FiLMiC Pro, which costs $9.99. It allows you to have much greater control over setting exposure. You can pick your aperture, shutter speed, and ISO (if you increase the ISO, the camera requires less light to make a picture, but the picture is usually not as good—a trade-off). You can also set your own color balance and monitor your audio levels.
Audio with Video
If you’re primarily shooting landscapes or labscapes, where audio is not critical, the phone’s built-in microphone is fine. If, however, you want to record people talking on camera, you’ll have to be more aware.
As with radio and podcasting, microphones and microphone placement are important. Ideally, microphones should be rather close to the subject to get good-sounding audio. A lapel mic usually sits about six inches below a speaker’s mouth. A reporter’s stick mic is usually best about two to three inches away from a speaker’s mouth. The built-in mic on the iPhone is actually pretty good when it is that close. But if the phone is that close to the subject, the picture won’t be very flattering. When it comes to using the iPhone’s built-in mic, you’ll probably want the speaker to be no further than two to three feet away, and that’s if the ambient noise is relatively low and your speaker has a good voice. Otherwise, the speaker’s voice will sound too soft and the mic will pick up more ambient noise than you want. Picking a good location to conduct a video interview is key, especially when you have no budget. If it’s a quiet environment, you can turn up the audio in editing, but if it’s loud, turning up the audio isn’t an option because all the ambient sound will get turned up too.
Putting It Together
Editing is as much an art as composing and shooting. You probably won’t be good at it at first, but now you have the tools to practice with. I always download my footage and edit on a computer using Final Cut Pro X. Mac computers ship with iMovie video-editing software installed. Windows computers usually ship with Windows Movie Maker editing software.
Whatever you use, editing software lets you move the clips around to come up with a sequence that tells the story effectively. The order in which you shot the clips doesn’t necessarily matter. You can trim the beginning and end points of your clips, adjust the audio, add additional narration, animate a still photo, drop in a lower-third title to identify a speaker, and add a map. There are even apps that allow you to edit on your phone, but I think the phone is too small a workspace. One simple—and free—app that has received good reviews is called Clips.
Don’t Forget It’s a Phone
Remember that your phone doesn’t stop being a phone just because you’ve decided to be a videographer. When you’re shooting video, I recommend turning on airplane mode so you can’t be interrupted by a phone call or a push-alert sound. Keep your eye on your battery level, and also your storage. Video can eat up storage fast. The iPhone 6s can shoot ultra-HD 4K video, which is 350 MB per minute. Regular HD 1080 video is still big, at 130 MB per minute. I always download my video off my iPhone to a hard drive, then back that up once. After that, I delete it from my phone to free up space.
So do you think it’s time to start practicing your video skills? If so, you probably have the perfect tool in your pocket or bag right now. For my part, I’d like to try shooting an entire expedition on my iPhone, and I think the necessary technology has finally arrived.
Lisa Strong is a video/multimedia storyteller specializing in science education and outreach. She produces video, live webcasts, photographs, and blogs for scientific-research expeditions. She’s been to sea in the Bay of Bengal, the western South Pacific, and above the Juan de Fuca Plate (twice). She’s been in the field in Antarctica and Greenland doing multimedia reporting for the Exploratorium science museum. Lisa teaches multimedia production skills for the Science Communication Program at the University of California, Santa Cruz, and she recently helped Exploratorium with their ultra-HD nine-screen media wall, producing environmental stories and shoreside live webcasts with the exploration vessel Nautilus. Lisa loves to keep up with visual-storytelling technology. She’s based in Marin County, California. Follow her on Twitter @Lisa_Strong.